|
|
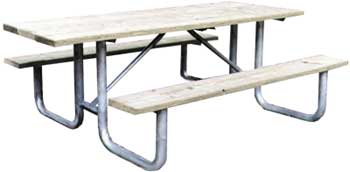
8' Heavy Duty Commercial Outdoor Park Picnic Table Frame Kit
|
Quantity in Basket:
None
Item: PICNICTABLE8WFRAME2
Price:
$428.50
Shipping Weight: 150.00 pounds
|
8' Commercial Picnic Table Galvanized Frame Kit. Lumber shown in picture is not included.
2.375 inch Outside Diameter, 0.154 inch wall thickness.
Purchase our picnic table frame kit and get all the hardware you need to build your own 8 foot commercial picnic table. Why pay money to ship lumber you can get local?
Our 8 ft Outdoor Commercial Park Picnic Table Frame Kit features a non-tip, non-trip walk through design. The one-piece galvanized frame is continuously MIG welded for superior strength. The 2 inch schedule 40 pipe is hot-dipped galvanized tubing. All pipe and tubing conform to ASTM A513-94 and all steel components conform to ASTM-A569. All cross braces are 1 inch schedule 40 pipe (.133 inch thick wall). Center brackets are 1/8 inch thick (12 guage) steel. Table and seat brackets are 3/16 inch thick (7 guage) steel. Assembly fasteners are 3/8 inch diameter galvanized steel carriage bolts. All hardware is included for assembly. Easy to assemble frame with only a 9/16 inch socket wrench. Buy five 2" x 10" x 8' wood boards, three for the table top and one for each of the benches at your local hardware store.
Outside dimension of frame is 2-3/8 inches. Inside dimension is 2 inches.
Please allow 2-4 weeks for product to be manufactured.
Manufactured in the U.S.A. to keep Americans working.
Heavy Duty Commercial Outdoor Picnic Table Galvanized Frame Kit Assembly Instructions:
Step 1: You will be provided with hole drilling schematic pages for drilling benches and table top boards. Once you have completed drilling boards, place the 3/8"-16 x 2-1/4" carriage bolts through the pre-drilled table top boards. Place boards and bolts with the table top facing the ground (refer to figure 1). Helpful hint: Use tape on head of bolt to hold it in place while setting the boards into the proper position.

Step 2: Place frame uprights over frame attachment bolts. Secure finger tight using one 3/8" lockwasher and one 3/8" nut per bolt. Repeat this step for each upright required (2 uprights for 6 foot & 8 foot picnic tables, 3 uprights for 10 foot and 12 foot picnic tables). On the outboard uprights, the flange should be placed towards the end of the table boards (refer to figure 2). On the 10 foot and 12 foot picnic tables, the center upright may be placed with the flange facing either end.

Step 3: Place two 3/8"-16 x 1" carriage bolts through the outside of the rectangular slots of the cross brace center bracket as shown in figure 3. If handicapped accessible is required, place one 3/8"-16 x 1" through the rectangular slot of the handicapped bracket as shown in figure 4. Attach the brackets to the table top by placing over the attachment bolt. Secure finger tight using one 3/8" lockwasher and one 3/8" nut per bolt.


Step 4: Attach the cross brace to the bolt in the cross brace center bracket using one 3/8" lockwasher and one 3/8" nut (refer to figure 3 above). Attach the other end of the cross brace using one 3/8"-16 x 1" carriage bolt, one 3/8" lockwasher and one 3/8" nut to the frame angle as shown in figure 5. Repeat this step for each cross brace required. Note: 10 foot and 12 foot picnic table frames have one cross brace that is shorter and has bent flanges on one end (12 foot picnic table frame) or both ends (10 foot picnic table frame). This cross brace needs to be attached to an inner frame upright as shown in figure 8. The cross brace shown in figure 8 is for a 12 foot picnic table. A 10 foot picnic table would have a cross brace (in the same location) with a bent flange on both ends.


Step 5: Attach the two seat boards to the frame uprights seat bracket. Align the seat board predrilled holes to the holes in the seat bracket, attach using four 3/8"-16 x 2-1/4" carriage bolts, four 3/8" lock washers and four 3/8" nuts per seat board. Refer to figure 9.

Step 6: Tighten all hardware. Tighten the nut until the bolt head starts to compress into the board. We recommend a 9/16" socket. WARNING: Do not over tighten the carriage bolts. Over tightening may cause the wood to splinter and/or split.
Step 7: Turn table upright. WARNING: Picnic Tables are very heavy. Turning the table over in an unsafe manner may cause injury. Exercise extreme caution when turning over.
|
|